

This is the seventh of a series of articles that will walk you through the Schloss Schwanberg case study.
You can download the case study used at the conference here:
You can read the all the existing articles that support the case study here: Schloss Schwanberg.
This article assumes that you have followed all the previous steps.
The previous article discussed adding a new custom Guest Entity using the Advanced Customization wizard.
This article will continue the case study and look at how to create the self service page that will allow a customer to review the booking details for the wedding and list the guests attending.
The starting point is the page "managebooking.asp".
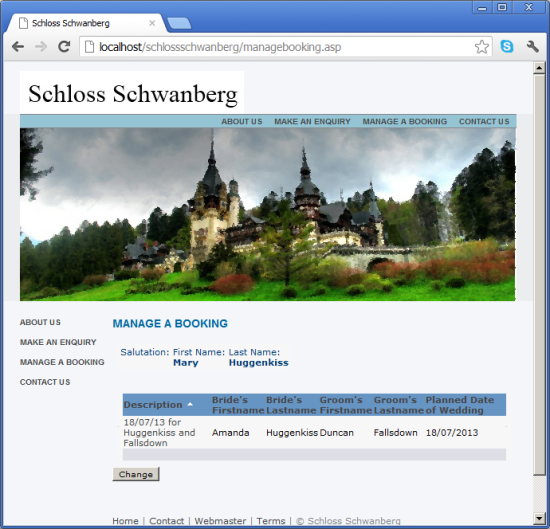
The customer needs to be able to click on the details of the booking. A hyperlink can be added to the SSOpportunityList List block that calls the bookingdetails.asp page.

Eventually the page that will be called will look like the the image below.
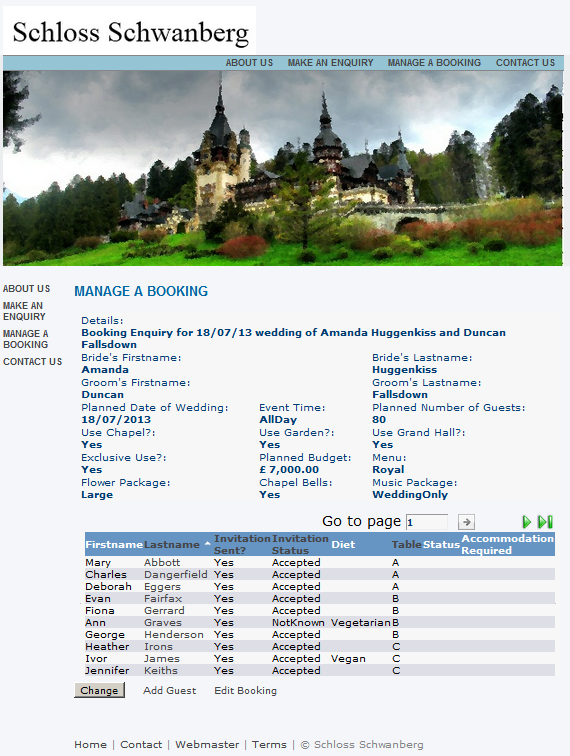
This assumes that the new Guest entity has been created and that a list has been added to display the Guest Information. In addition there needs to be a screen block to present the Booking details.
The Booking Details Screen
This is a screen block called SSOpportunityEntry created under the Opportunity entity that is being used to hold the Booking details.

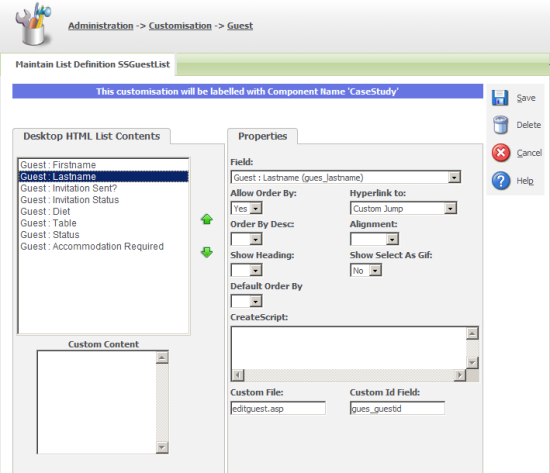
There also needs to be a List block created under the Guest custom entity. I called this new List 'ssGuestList'.
Creating the Code for the Booking Details page.
The code for the bookingdetails.asp can be separated out into bookingdetailpagecode.js and an 'include' can link the code to the ASP page. This allows bookingdetails.asp to be used to control the general style and layout of the page.

Below is the code contained in bookingdetailspagecode.js.
[code language="javascript"]
<%
if (!CRM.Authenticated)
{
//Logon function defined in eWaress.js
//assumes ewarelogon.inc in folder
eWareLogin();
}
else
{
var intVisitorId = CRM.VisitorInfo("visi_personid");
var strKeyID= "oppo_opportunityid";
var Id = new String(Request.Querystring(strKeyID));
var intRecordId = 0;
if (Id.indexOf(",") > 0)
{
var Idarr = Id.split(",");
intRecordId = Idarr[0];
}
else if (Id != "")
{
intRecordId = Id;
}
var ListBlock = CRM.GetBlock("SSGuestList");
ListBlock.ArgObj = "gues_opportunityid ="+intRecordId;
var ScreenBlock = CRM.GetBlock("SSOpportunityEntry");
var oppoRecord = CRM.FindRecord("Opportunity","oppo_opportunityid="+intRecordId + " and oppo_primarypersonid = "+intVisitorId );
//Setup Block Container
ScreenBlock.ArgObj=oppoRecord;
var myBlockContainer = CRM.GetBlock("Container");
with (myBlockContainer)
{
AddBlock(ScreenBlock);
AddBlock(ListBlock);
AddButton("Add Guest");
}
if (oppoRecord.eof)
{
Response.Redirect("index.asp");
}
Response.Write(myBlockContainer.Execute());
}
%>
[/code]
Notes
- Opportunity ID (oppo_opportunityid) is passed as the unique ID of the booking record. This is used to retrieve the opportunity record displayed in the ssOpportunityEntry screen and the list of guests. The visi_personid retrieved by in the VistorInfo() method is used to ensure that a customer can only see their own data.
- By default the container block will draw the edit button that can be used to change the screen into edit mode to allow the visitor to update the booking details. This can be controlled using the API methods. You could turning off the standard button in order to create you own button or link to call your own edit behaviour. An example of a simple custom button or hyperlink is the 'Add Guest' hyperlink.