

In this post, the second installment in my series on non-routine transactions, I’ll explain how to issue a refund check to a customer. If you read my previous post on recording a refund from a vendor, you’ll notice that the two processes mirror each other closely. In this example, I’m assuming the customer already has an open credit on their account, and that is the reason for the refund.
This is a two-step process. (1) Issue the check. (2) Deal with the customer’s balance.
To issue the check, go to the Tasks menu and choose Payments. Click the down arrow next to Vendor ID and select Customer ID from the list. In the next field enter the customer’s ID or select it from the list. You’ll see their name and address appear in the Pay to the order of section.
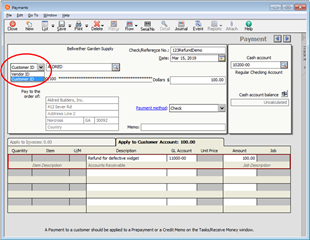
Complete the rest of the top-half of the screen (Check number, date, etc.) just like you would for any other check. On the Apply to Customer Account tab, you can enter a description. The GL Account will automatically be set to your accounts receivable account - Do not change it. Finally enter the amount if you didn’t already enter it in the top half of this screen. Click the Print button to print the check now or click Save to save the check and print it later.
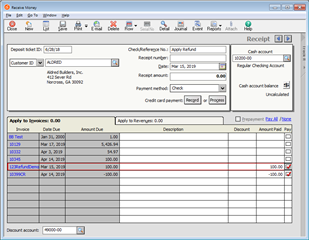
To apply the refund to the customer’s balance simply go to the Tasks menu and choose Receive Money. You’re going to enter a $0.00 cash receipt. If you skip this step, the refund and the related credit memo will continue to appear on the aged receivables report even when the customer’s balance is zero.
- Select the customer in the Customer ID field.
- Enter “Apply Refund” or something similar in the Check/Reference No. field
- Receipt Number can be left blank.
- Set the date to the date of the refund check.
- On the Apply to Invoices tab the check number of the refund will show in the Invoice Check the Pay box on that line. Then, check the Pay box for the credit memo the refund was issued for. The two amounts should offset each other so the total amount of the receipt is $0.00. If there is no credit memo, you’ll need to stop and create one.
If you print deposit tickets out of Sage 50, be sure to enter a unique deposit ticket ID for this transaction, otherwise it will throw off the number of items in your deposit. If you don’t print deposit tickets from Sage 50, this can have the same deposit ticket ID as other transactions since the net $0.00 amount won’t throw off the total deposit amount.
If you have questions about this process or have topics you’d like to see covered in future blog entries, please post in the comments below.
 Steve Collins (aka StephenC)
Sage 50 U.S. Certified Consultant
IQ Accounting Solutions LLC
Check out my blog and YouTube channel for additional Sage 50 and Excel Tips.
